
You spent hours building your tech accessory store, but blurry product images and lifeless mockups kill sales before customers even consider buying. Professional mockup design can feel complicated, but this guide walks you through a proven workflow that boosts e-commerce sales by up to 40%. You will learn exactly how to create photorealistic mockups that turn browsers into buyers.
Table of Contents
- Prerequisites And Asset Preparation
- Step-By-Step Mockup Design Process
- Common Mistakes And Troubleshooting
- Alternative Approaches And Tradeoffs
- Expected Results And Outcomes
- Explore Bettermockups To Elevate Your Tech Accessory Branding
- Frequently Asked Questions
Key Takeaways
| Point | Details |
|---|---|
| Organize assets first | Proper preparation reduces rework by 30-50% and streamlines your entire design process. |
| Use device-specific templates | Templates matched to exact device models create authentic presentations that build customer confidence. |
| Adjust lighting and backgrounds | Photorealistic adjustments make mockups indistinguishable from professional photography. |
| Avoid common pitfalls | Skipping safe zones, ignoring color profiles, and poor lighting destroy otherwise solid designs. |
| Expect measurable results | Professional mockups increase conversion rates up to 40% and build brand trust by 30%. |
Prerequisites and Asset Preparation
Starting mockup design without proper preparation creates frustrating delays and poor results. You need specific assets and tools ready before opening any design software.
Gather these essential materials:
- High-resolution product images at minimum 300 DPI showing your tech accessory from multiple angles
- Brand logos in vector format (SVG or AI files) for crisp, scalable placement
- Complete brand color palette with exact hex codes for consistent styling
- Device specifications matching your product (iPhone 15 Pro dimensions, Samsung Galaxy S24 measurements)
- Design platform access (Canva account, Photoshop subscription, or Bettermockups membership)
Organizing these assets before design reduces rework by 30-50% and dramatically improves workflow efficiency. Create a dedicated folder system with subfolders for raw images, logos, color palettes, and final exports. Name files descriptively using consistent conventions like “productname_angle_date.png” so you can find assets instantly.
Understanding device specifications matters more than most entrepreneurs realize. A mockup designed for iPhone 14 dimensions looks awkward on iPhone 15 Pro Max listings because screen ratios and camera placements differ. Check exact specifications on manufacturer websites before selecting templates. This precision prevents customer confusion and reduces returns from inaccurate product expectations.
Platform choice depends on your skill level and project complexity. Canva offers drag-and-drop simplicity perfect for beginners. Photoshop provides advanced control for experienced designers. Bettermockups delivers device-specific templates that combine professional quality with accessible customization. The right mockup workflow for tech accessories matches your current abilities while leaving room to grow.
Pro Tip: Take 30 minutes to build a complete asset library before starting any mockup project. This upfront investment saves hours of searching mid-design when creative momentum matters most.
Step-by-Step Mockup Design Process
You have assets organized and tools ready. Now follow this proven workflow to create mockups that stop scrollers and convert clicks into purchases.
-
Set up your design workspace by opening your chosen platform and creating a new project at 3000x3000 pixels minimum resolution. Higher starting resolution maintains quality when resizing for different platforms. Configure your color profile to sRGB for web display or Adobe RGB for print materials.
-
Select a device-specific mockup template that precisely matches your product model. Browse platform libraries filtering by device type, angle, and presentation style. Templates showing devices in lifestyle settings (on desks, in hands, near coffee cups) typically outperform isolated product shots by creating relatable contexts buyers imagine themselves using.
-
Apply your product design using smart layers or drag-and-drop features depending on your platform. Canva reduces mockup creation time by 50% by automating perspective adjustments that traditionally required manual warping. Position your design within safe zones, maintaining at least 3mm margins from edges to prevent important elements from getting cut off during production.
-
Adjust lighting and shadows to create photorealistic depth that makes flat designs appear three-dimensional. Increase shadow opacity by 10-20% for products photographed in bright environments. Soften shadow edges for natural light scenarios. Match light direction across all mockups in a product line to maintain visual consistency that signals professional branding.
-
Refine background elements by adjusting blur, saturation, and composition to keep focus on your product while providing context. Slightly desaturated backgrounds (reduce by 15-20%) make colorful products pop without creating jarring contrasts. Consider backgrounds that subtly reinforce your brand story, like minimalist desks for productivity accessories or vibrant textures for lifestyle products.
-
Export final images at 300 DPI in PNG format for transparent backgrounds or JPEG for smaller file sizes. Name exports systematically with product name, angle, and version number. Create multiple aspect ratios in one session (square for Instagram, vertical for Pinterest, horizontal for website banners) to maximize your design time investment.
Follow these mockup design tips 2026 techniques and reference the master mockup workflow guide for platform-specific optimization strategies. Browse iPhone case mockup templates to see professional examples demonstrating these principles in action.

Pro Tip: Save your project file with layers intact before final export. This preserves your work for quick updates when launching new product variations or running seasonal promotions without starting from scratch.
Common Mistakes and Troubleshooting
Even experienced designers fall into predictable traps that undermine otherwise solid mockup work. Recognizing these pitfalls before they happen saves time and protects your professional reputation.
Skipping asset organization creates cascading problems throughout your project. You waste minutes hunting for the right logo version or product photo while creative momentum evaporates. Build that organized folder system first, always. The 20 minutes invested upfront prevents hours of frustration later.
Neglecting safe zones and bleed areas causes costly print errors when manufacturers trim edges during production. Your carefully placed brand name disappears or important design elements get cut in half. Maintain minimum 3mm margins from all edges and extend backgrounds 3mm beyond trim lines. Most professional templates include visible safe zone guides, so actually use them instead of assuming your eye can judge distances accurately.
Poor lighting adjustments destroy photorealism faster than any other single mistake. Shadows pointing different directions across a product line look amateurish and inconsistent. Light sources must match across all mockups in a series. If your template shows sunlight from upper left, every mockup in that collection needs identical lighting direction. Adjusting lighting increases buyer engagement because realistic depth perception triggers stronger purchase intent.
Color profile mismatches create frustrating inconsistencies where your mockup looks perfect on screen but prints with shifted hues or displays differently across devices. Always work in sRGB color space for digital products. Convert to CMYK only for items going to professional print. Export settings must match your final use case, period. Check the mockup design workflow guide for detailed color management strategies.
Resolution shortcuts come back to haunt you when platforms or clients request larger sizes. Starting at 3000x3000 pixels minimum gives flexibility to crop, resize, and repurpose without quality loss. You can always scale down cleanly, but upscaling introduces blur and pixelation that screams unprofessional. Invest the extra rendering time upfront.
Ignoring mobile display testing leaves money on the table since 70% of e-commerce traffic comes from phones. Your mockup might look stunning on desktop but become an unreadable mess on smaller screens. Always preview exports on actual mobile devices before publishing to catch sizing issues, text legibility problems, or cluttered compositions that need simplification.
Alternative Approaches and Tradeoffs
Different mockup creation methods suit different skill levels, budgets, and project timelines. Understanding tradeoffs helps you pick the right approach for your specific situation.
PSD templates offer high customization but require advanced skills. You get complete control over every layer, shadow, and effect. This flexibility matters for complex branding requirements or unique product angles not available in standard templates. However, you need Photoshop expertise and considerable time investment. Learning curves frustrate beginners who just want quick results.
Canva templates are faster and user-friendly with drag-and-drop interfaces that eliminate technical barriers. Non-designers create professional results in minutes instead of hours. The tradeoff comes in reduced customization depth. You work within template constraints rather than building completely custom compositions. For most tech accessory sellers, this limitation rarely matters because pre-built templates cover common scenarios effectively.
Animated mockups boost social engagement by showing products rotating, screens lighting up, or cases snapping onto devices. Video content typically doubles engagement rates compared to static images. The cost comes in file size, production complexity, and platform compatibility. Not all marketplaces support video uploads, and larger files slow page load speeds.
| Approach | Speed | Customization | Skill Required | Best For |
|---|---|---|---|---|
| PSD Templates | Slow (3-4 hours) | Complete control | Advanced Photoshop | Unique branding needs |
| Canva Templates | Fast (30-60 min) | Moderate flexibility | Beginner friendly | Quick iterations |
| Animated Mockups | Medium (1-2 hours) | Template-based | Intermediate video skills | Social media campaigns |
| Professional Photography | Very slow (days) | Unlimited realism | Hire photographer | Premium brand positioning |
Your ideal approach depends on current skills, available time, and sales goals. Beginners should start with Canva mockup templates to build confidence and portfolio quickly. Experienced designers benefit from PSD mockups benefits when brand differentiation justifies extra effort. Growing businesses experiment with animated mockup templates once static images perform consistently.
Most successful entrepreneurs use hybrid strategies, mixing formats strategically. Create hero images with PSD templates for maximum impact on product pages. Generate variations quickly in Canva for A/B testing different angles. Deploy animated versions specifically for Instagram Reels and TikTok where motion content dominates. Match method to medium instead of forcing one approach everywhere.
Expected Results and Outcomes
Implementing this mockup design workflow delivers measurable improvements across multiple business metrics. Setting realistic expectations helps you evaluate success and refine your approach over time.
Timeline expectations matter for planning and resource allocation. Creating your first professional mockup takes 3-4 hours including asset preparation, tool familiarization, and design iterations. By your fifth mockup, that time drops to 1-2 hours as workflows become automatic and decision-making speeds up. Experienced users complete simple mockups in 30-45 minutes once templates and assets live in organized libraries.
Photorealistic mockups boost e-commerce sales by up to 40% by reducing purchase hesitation through clear product visualization. Customers understand exactly what they receive, eliminating the guessing game that kills conversions. This improvement compounds over time as your listing gains positive reviews from satisfied buyers who received products matching their expectations.
Key performance indicators you should track:
- Conversion rate increases of 25-40% within 30 days of implementing professional mockups
- Return rate reductions of 15-25% from accurate product representation
- Average order value growth of 10-20% as premium presentation justifies higher pricing
- Social media engagement doubling when using lifestyle mockups versus plain product shots
- Email click-through rates improving 30-50% with eye-catching mockup imagery
Brand trust improves approximately 30% when consistent, professional mockups appear across all customer touchpoints. Cohesive visual branding signals legitimate business operations versus fly-by-night operations using stock photos. Customers perceive your business as established and reliable, lowering barriers to first purchase.
Exporting at 300 DPI ensures professional appearance across every platform from Instagram posts to Amazon listings to billboard advertisements if your business scales that far. Future-proofing with high resolution means you never need to recreate assets when opportunities demand larger formats. This investment pays dividends for years as you repurpose quality mockups across evolving marketing channels.
Customer satisfaction increases naturally when product photos accurately represent real-world appearance. Fewer surprise disappointments mean more positive reviews, higher repeat purchase rates, and valuable word-of-mouth referrals. Your marketing cost per acquisition drops as organic growth supplements paid advertising. Check detailed impact metrics in our product mockups benefits analysis.
Sales Impact: E-commerce businesses implementing professional mockup workflows report 40% average sales increases within 60 days, with improvements sustained long-term as optimized listings gain ranking momentum.

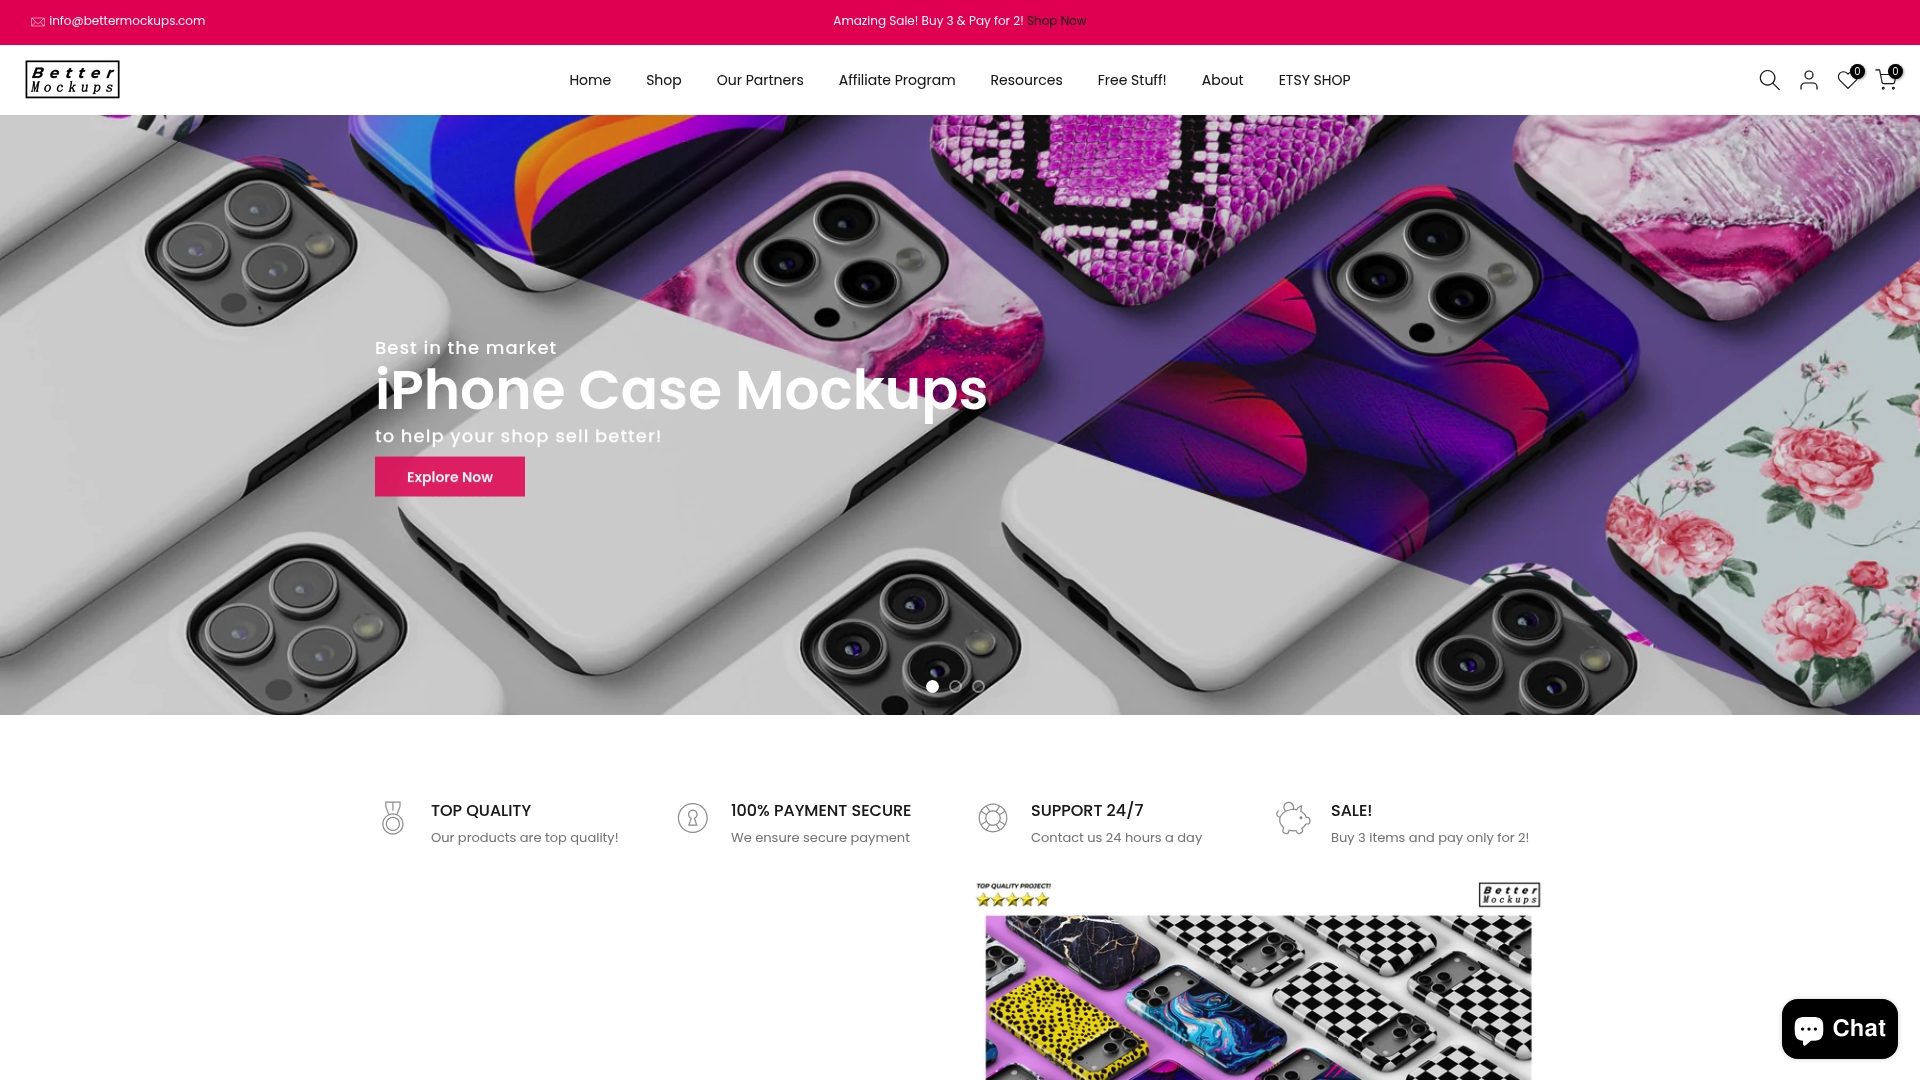
Explore Bettermockups to Elevate Your Tech Accessory Branding
You now understand the complete mockup design workflow from asset preparation through final export. Putting these principles into action requires quality templates and efficient tools.
Bettermockups delivers device-specific mockup templates engineered specifically for tech accessory entrepreneurs. Browse the new mockups collection featuring the latest iPhone, Samsung, and AirPods models with photorealistic lighting and professional compositions. Each template includes smart layers that automatically adjust perspective when you add designs, eliminating tedious manual warping.
The platform supports both Canva and PSD formats, letting you work in whichever environment matches your skill level. Beginners appreciate instant results with Canva templates while experienced designers leverage PSD files for complete creative control. Explore specialized iPhone case mockups showing devices in lifestyle settings that drive engagement and conversions.
Detailed tutorials at how to use Bettermockups walk you through platform features, optimization techniques, and workflow strategies that help you achieve that 40% sales boost. Stop settling for amateur product presentations that cost you customers every single day.
Frequently Asked Questions
Can non-designers create photorealistic mockups?
Absolutely. User-friendly platforms like Canva make professional mockups accessible to complete beginners through drag-and-drop interfaces and pre-built templates. You need zero design experience to create sales-boosting product images within an hour.
How long does creating a high-quality mockup typically take?
Once assets are organized, expect 1-2 hours per mockup using streamlined workflows and quality templates. Your first attempts take longer as you learn tools and techniques, but speed increases dramatically with practice. Experienced users complete simple mockups in 30-45 minutes.
Which mockup format works best for social media marketing?
Animated mockups showing products rotating or screens activating typically double engagement rates compared to static images on platforms like Instagram and TikTok. The motion naturally catches attention in crowded feeds. However, static lifestyle mockups still outperform plain product photos significantly, making them valuable when video production exceeds your current capabilities.
How important is selecting device-specific templates?
Extremely critical for customer trust and reduced returns. Templates matching exact device models (iPhone 15 Pro versus iPhone 14) show accurate camera placements, button positions, and screen ratios that build buyer confidence. Generic templates create mismatched expectations leading to disappointed customers and negative reviews. Review different mockup template types to understand format impacts.
What export settings ensure the best image quality?
Always export at 300 DPI resolution in PNG format for images requiring transparency or JPEG for smaller file sizes on speed-sensitive platforms. Use sRGB color profile for all digital applications to ensure consistent appearance across devices and browsers. Save master files with intact layers before exporting so you can easily create variations later without recreating work from scratch.
Recommended
- Mockup Trends in 2026: Elevate E-Commerce Sales – Bettermockups
- Mockup Design Tips 2026: 40% Boost for Tech Accessory Sales – Bettermockups
- Types of Mockup Templates: Boosting Product Sales – Bettermockups
- Mockup Design Workflow Guide for Stunning Product Images – Bettermockups
- High-End Fashion Trends 2026: 60% Embrace Sustainability


