
Canva has become the go-to design tool for POD sellers who need professional visuals without learning Photoshop. When it comes to Canva mockup templates, the platform offers a solid library for showcasing t-shirts, tote bags, mugs, and digital screens. For sellers managing dozens or hundreds of listings, that accessibility matters.
The catch? Canva handles general mockup needs well, social media graphics, marketing materials, basic product shots. But for specialized products like phone cases, the templates often miss the mark. Camera cutouts don't match current models. Edge profiles don't align with what manufacturers like Podbase or Casestry actually ship. That's the gap production-accurate mockup tools like Bettermockups exist to fill.
This guide covers how to create realistic mockups in Canva, step by step, plus when to recognize that a general-purpose tool might not cut it for products that demand precision.
What Canva mockup templates are and what you need
Canva mockup templates are pre-designed frames that let you insert your artwork onto products or scenes without starting from scratch. Think of them as digital staging areas where you drop your design into a placeholder, and Canva automatically positions it on a t-shirt, phone screen, coffee mug, or business card. The platform includes both free and paid templates accessed through its search bar or the Elements panel.
These templates use smart layers that warp your design to match perspective and surface curves. You upload a flat PNG or JPEG, click the placeholder area, and Canva applies the transformation. That's the core mechanic. The quality of the final result depends entirely on how accurate the template is to the real product you're selling.
What Canva provides in its mockup library
Canva's built-in mockup collection covers apparel basics like t-shirts and hoodies, lifestyle scenes with laptops and phones, and print materials like posters and business cards. You'll find templates for tote bags, mugs, book covers, and device screens. The variety works well for general marketing visuals and social media posts where exact product specs aren't critical.
Most Canva mockup templates prioritize aesthetic appeal over manufacturing accuracy, which creates problems for POD sellers who need exact camera cutout placement or finish representation.
What you need before you start
You need a Canva account (free or Pro), your design file saved as a high-resolution PNG with a transparent background, and a clear understanding of what product you're mocking up. If you're using Canva's templates for phone cases, verify the model year and manufacturer specs before publishing. Templates labeled "iPhone mockup" often default to older models or generic shapes that don't match what Podbase or Casestry actually manufactures.
Pro accounts unlock additional mockup templates and remove watermarks, but the core limitation stays the same: Canva wasn't built for product-specific accuracy.
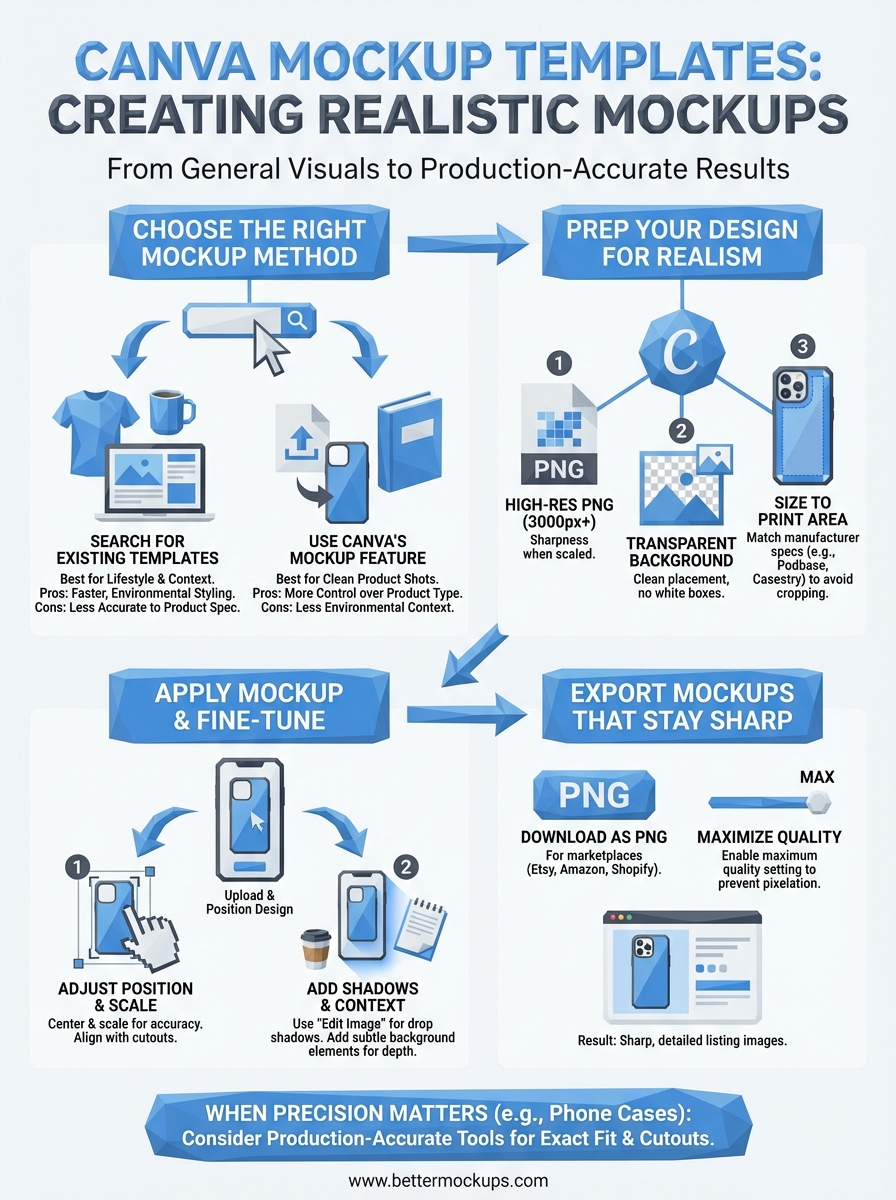
Step 1. Choose the right mockup method in Canva
Canva offers two distinct paths for creating mockups: searching for pre-made templates or using the built-in mockup feature on uploaded images. Your choice depends on whether you need a styled scene (coffee shop table with a laptop) or a clean product shot (phone case on a white background). Most POD sellers start with template search because it feels faster, but the mockup feature often produces cleaner results for products.
Search for existing mockup templates
Type your product name plus "mockup" in Canva's search bar. Examples: "phone mockup," "hoodie mockup," "mug mockup." Filter results by Free or Pro depending on your account type. Click a template to open it, then locate the placeholder image (usually marked with a faint border or icon). Click that area, upload your design, and Canva applies it to the template. This method works well for lifestyle shots where you want environmental context, but verify the product shape matches what you actually sell.
Template accuracy matters more than aesthetic appeal when customers compare your listing photo to the item they receive.
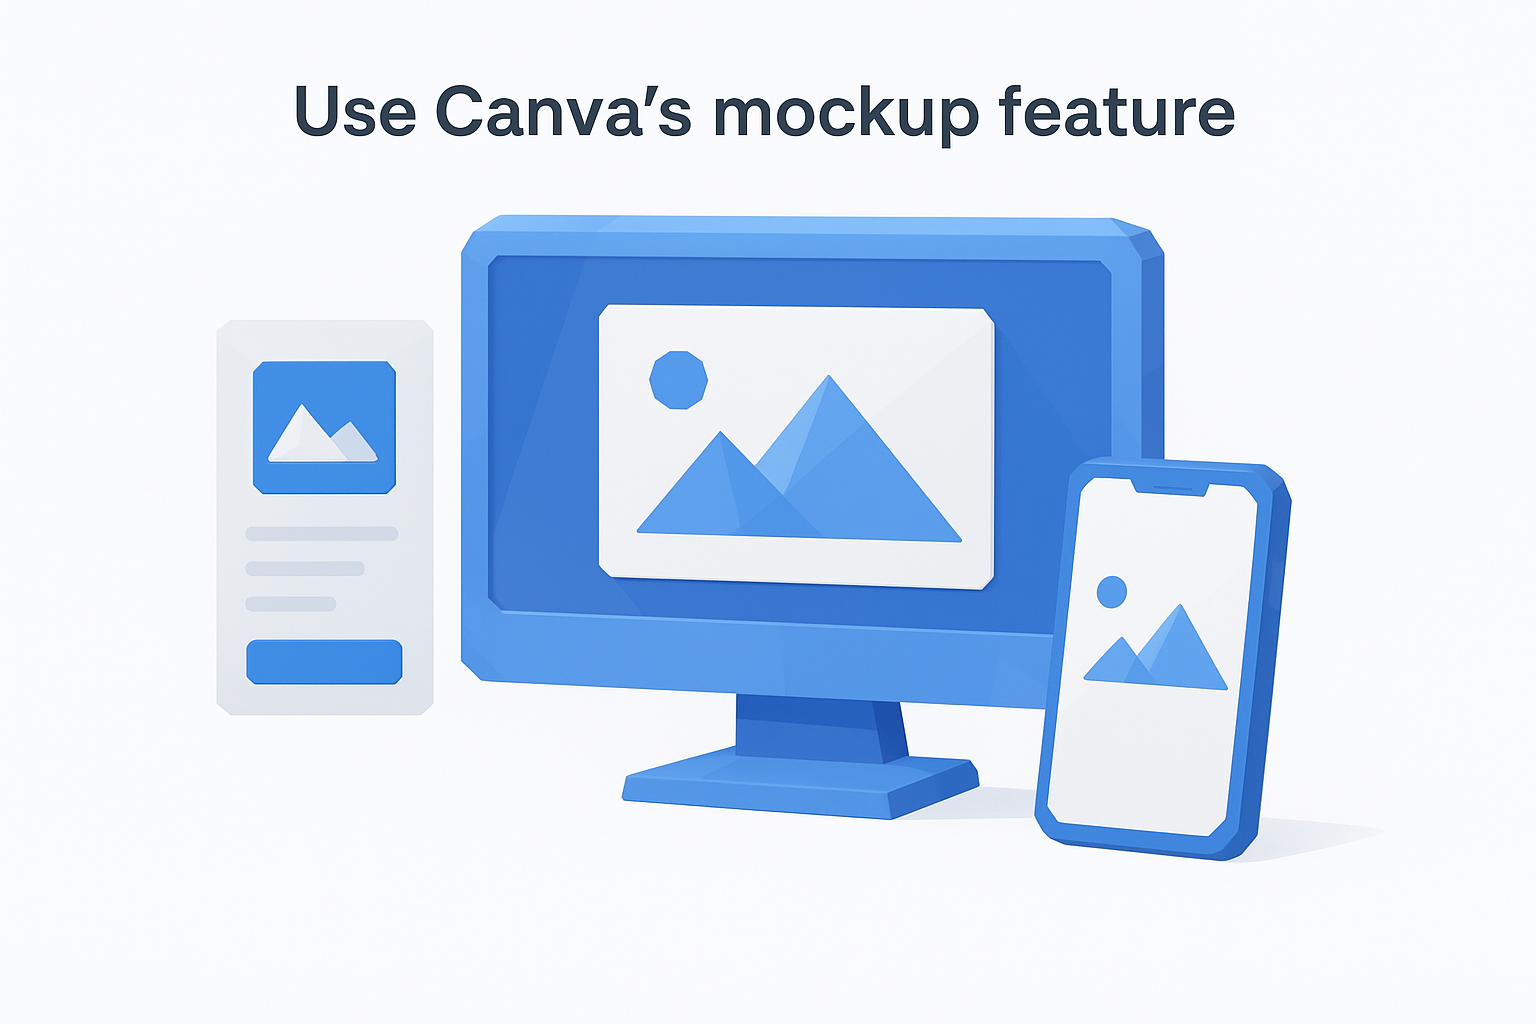
Use Canva's mockup feature
Upload your design as a PNG with a transparent background. Right-click the image, select "Edit image," then choose "Mockup" from the left panel. Canva generates product options like t-shirts, mugs, and phone cases. Select the product type, and Canva automatically positions your design. This method gives you less environmental styling but more control over product accuracy.
Step 2. Prep your design so it looks real on the product
Your design file determines mockup quality more than the template itself. A low-resolution JPEG with a white background will look flat and unprofessional no matter which Canva mockup templates you use. The prep work happens before you open Canva, and it takes five minutes.
Export your design at the right resolution
Save your artwork as a PNG file with a transparent background at a minimum of 3000 x 3000 pixels. This resolution ensures your design stays sharp when Canva scales it to fit different products. Most design tools (Photoshop, Illustrator, Procreate) offer PNG export with transparency as a standard option. If your design includes a background color that's intentional, keep it. If it's white by default, remove it so the mockup template can place your artwork cleanly on the product surface.
Transparent backgrounds let Canva position your design accurately without visual clutter from mismatched edges or white boxes.
Size your design to match the product's print area
Check the actual print dimensions your POD manufacturer uses before placing your design in a mockup. A phone case design that fills edge to edge in your file might need margins to account for camera cutouts and case borders in production. Resize your design in your original design software (not Canva) to match those specs, then export. This prevents Canva from cropping critical design elements when it applies the mockup.
Step 3. Apply a Canva mockup and fine-tune realism
Once you've selected your mockup template and prepared your design file, the placement process takes less than a minute. Click the placeholder area in your chosen template (usually marked with a faint icon or border), then select "Upload files" to add your PNG. Canva automatically positions your design within the mockup's smart object layer. That's the baseline application. The realism work happens next.
Adjust position and scale for accuracy
Drag your design within the placeholder to center it properly on the product surface. Use the corner handles to scale up or down without distorting proportions. Most Canva mockup templates apply perspective automatically, but you control placement. For phone cases, verify your design aligns with the camera cutout and doesn't extend into edge margins that won't print. For apparel, check that your artwork sits within the chest print area rather than stretching to the collar or sleeves.
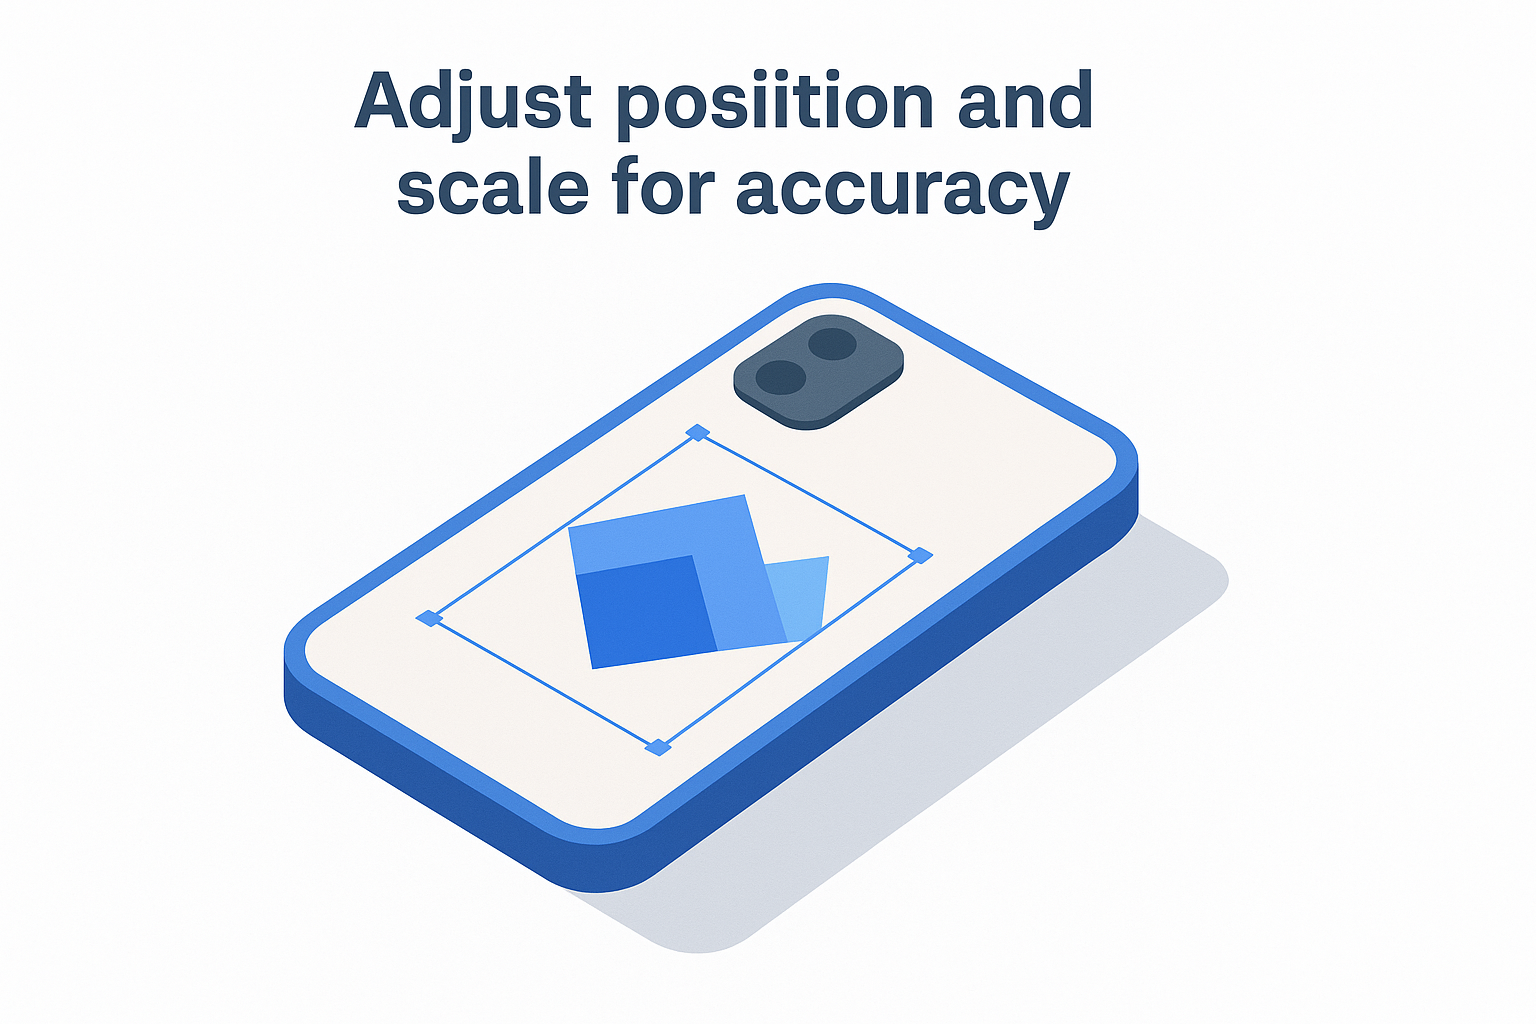
Realistic mockups match your manufacturer's actual print area, not just the template's visual boundaries.
Add shadows and context elements
Layer additional elements like drop shadows or background objects to make the product feel placed rather than floating. Canva's effects panel includes shadow options under "Edit image." Subtle shadows beneath the product create depth without overwhelming the design. Keep backgrounds clean if you're listing on marketplaces that prefer white or neutral backdrops.
Step 4. Export mockups that stay sharp everywhere
Your mockup looks perfect in Canva's editor, but the export settings determine whether it stays sharp on Etsy, Amazon, or TikTok Shop. Most sellers click "Download" without checking the quality slider, then wonder why their listing images look pixelated compared to competitors. Canva defaults to a compressed file size that loads quickly but sacrifices detail. You need to override that setting every time you export.
Download at the highest quality setting
Click the "Share" button in the top right corner, then select "Download." Change the file type dropdown to PNG for product mockups (never JPG for listings). Before clicking the final download button, look for the quality slider or checkbox labeled "Use maximum quality" and enable it. This exports your mockup at full resolution instead of Canva's compressed default. The file size increases, but marketplace image requirements prioritize detail over file weight.
Maximum quality exports prevent pixelation when customers zoom in on your listing photos.
Choose the right file format for each platform
Use PNG files for marketplace listings (Etsy, Amazon, Shopify) where background transparency or image sharpness matters. Save JPG files for social media ads and email marketing where smaller file sizes improve load times. Verify your exported mockup meets each platform's minimum pixel dimensions before uploading: 2000 x 2000 pixels for most marketplaces, 1080 x 1080 pixels for Instagram.
A simple next step for better product visuals
Canva mockup templates handle general product visualization well enough for marketing materials and social media content. You've learned how to upload designs, apply them to templates, and export at maximum quality. That workflow works when product accuracy takes a back seat to aesthetic appeal.
Phone cases, AirPods cases, and device accessories operate under different rules. Your customers zoom in on camera cutout placement, case finish, and edge profiles before they click buy. They compare your listing photo to competitors who use production-accurate mockups, and they notice the difference. Generic mockup tools can't match manufacturer specifications because they weren't built to.
When your product demands precision, BetterMockups delivers phone case mockups built from actual Podbase and Casestry cases, with video templates that convert on TikTok Shop and accurate representations that eliminate refunds caused by visual mismatch. That's the gap this platform fills.


